User Manual
1. Connection Instructions – Infrared Starting Beams
These instructions apply to the standard option where infrared beams are at the start and end of the racing track.
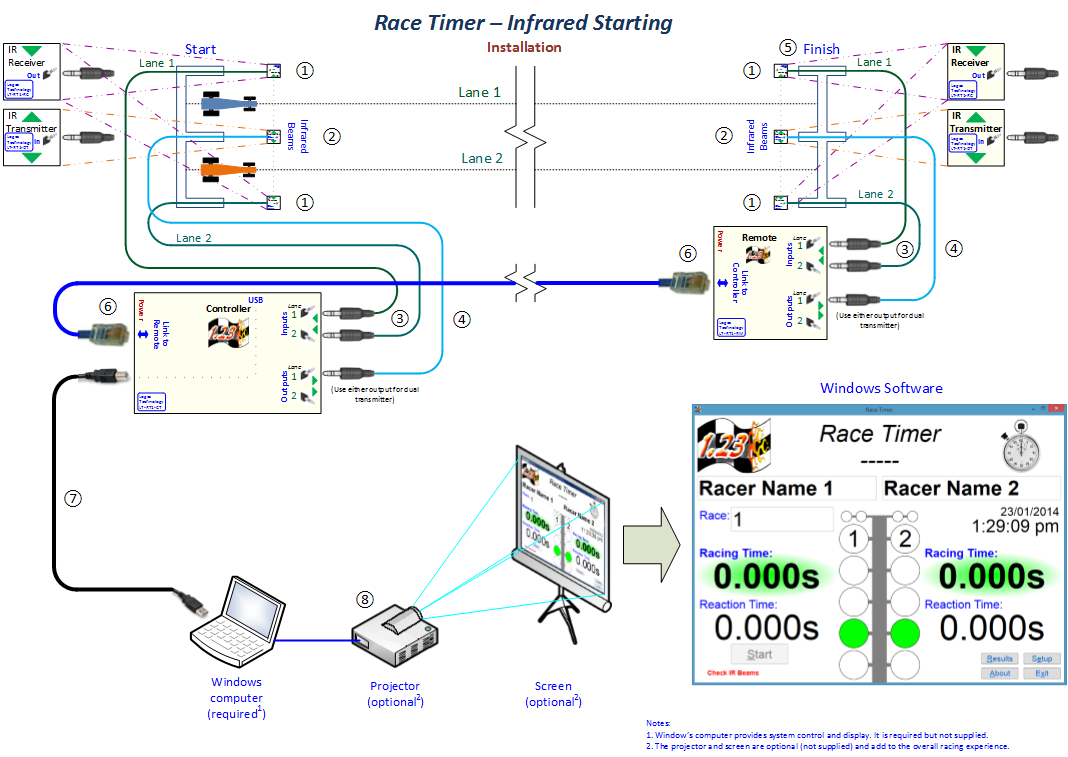
Please refer to the installation diagram named “Race Timer – Infrared Starting”. The numbers on the diagram refer to the numbered points below.
Follow the steps below before operating the modules and the PC software when infrared starting beams are deployed.
- Mount two (2) IR receiver modules on either side at the start line, clear of the front of the racing cars so that the IR beam will not be blocked. Make sure that the IR beam module entrance holes point across the track, so there is no interruption of the line-of-sight path of the beam. Double sided tape or glue can be used to fix the IR receiver and transmitter modules in their correct locations. Note that the receiver and transmitter modules can be placed either way up so that IR light beam is aligned and the connections are conveniently placed to ensure the signal lead is kept clear of the moving car.
- Mount a single start IR dual transmitter between tracks and point directly to each of the IR receivers from the IR beam holes on each side.
- Connect 3.5mm leads from the IR receiver modules to the correct receiver inputs on the main controller unit for both lanes 1 and 2. Note that any leads should be physically secured (e.g. taped down) in order to keep them clear of any moving components/vehicles and secure them against trip hazards.
- Connect a 3.5mm lead from the IR dual transmitter module to the main controller unit on either transmitter output. Note that the lead can go either way around.
- Repeat steps 1 to 4 for the finish end of the track, connecting the IR receiver and transmitter units to the remote module located at the end of the track.
- Connect the network lead between the remote and main controller units, linking them together. Note that the lead can go either way around.
- Connect the USB B plug (square) to the main controller and the USB A end (rectangular) to the computer and switch on the computer.
- Optionally connect a projector to the computer for viewing the racing on a large screen. This adds to the racing experience.
-
Switch on the computer and check all
the connections:
- Check that both the main controller and remote modules have lit power lights.
- The lights where the IR transmitter units are connected should be lit on both the main controller and the remote modules.
- The lights where the IR receiver units are connected on both the main controller and remote modules will be lit when IR beams are aligned: this is essential for correct operation.
Notes:
- The IR (Infrared) light is invisible to the naked eye and also harmless.
- Optionally two single transmitter modules can replace the single dual transmitter module when a central dual transmitter is physically possible to mount. In this case mount each single transmitter module as required and point it at its counterpart receiver. The leads for each transmitter connect to either transmitter output of the controller module.

